Medical Records by Fax: 8 Safety Tips
Treat faxing medical records like a checklist—verify recipient, send only requested legible pages, and confirm delivery to avoid PHI breaches.
Medical Records by Fax: 8 Safety Tips
Faxing medical records is still common, but one small mistake can send PHI to the wrong place. I’d boil this article down to eight checks: verify the recipient, send a clear PDF, keep each packet to one request, split large files, review the release, stay within page limits, use a plain cover sheet, and confirm delivery when the fax matters most.
HIPAA permits faxing PHI if I use proper safeguards. But mistakes still cost time, delay care, and can lead to fines. The article points to two facts that stand out: about 70% of healthcare communication still goes by fax, and a fax-related HIPAA case led to a $2.5 million penalty.
If I want the short version, here it is:
- Check the fax number and department
- Send only the pages requested
- Make sure every page is readable
- Do not mix records from different requests
- Split files over 50 pages or 20 MB
- Match the records to the right release
- Use a cover sheet with routing info, not extra PHI
- Save the send log and call for urgent records
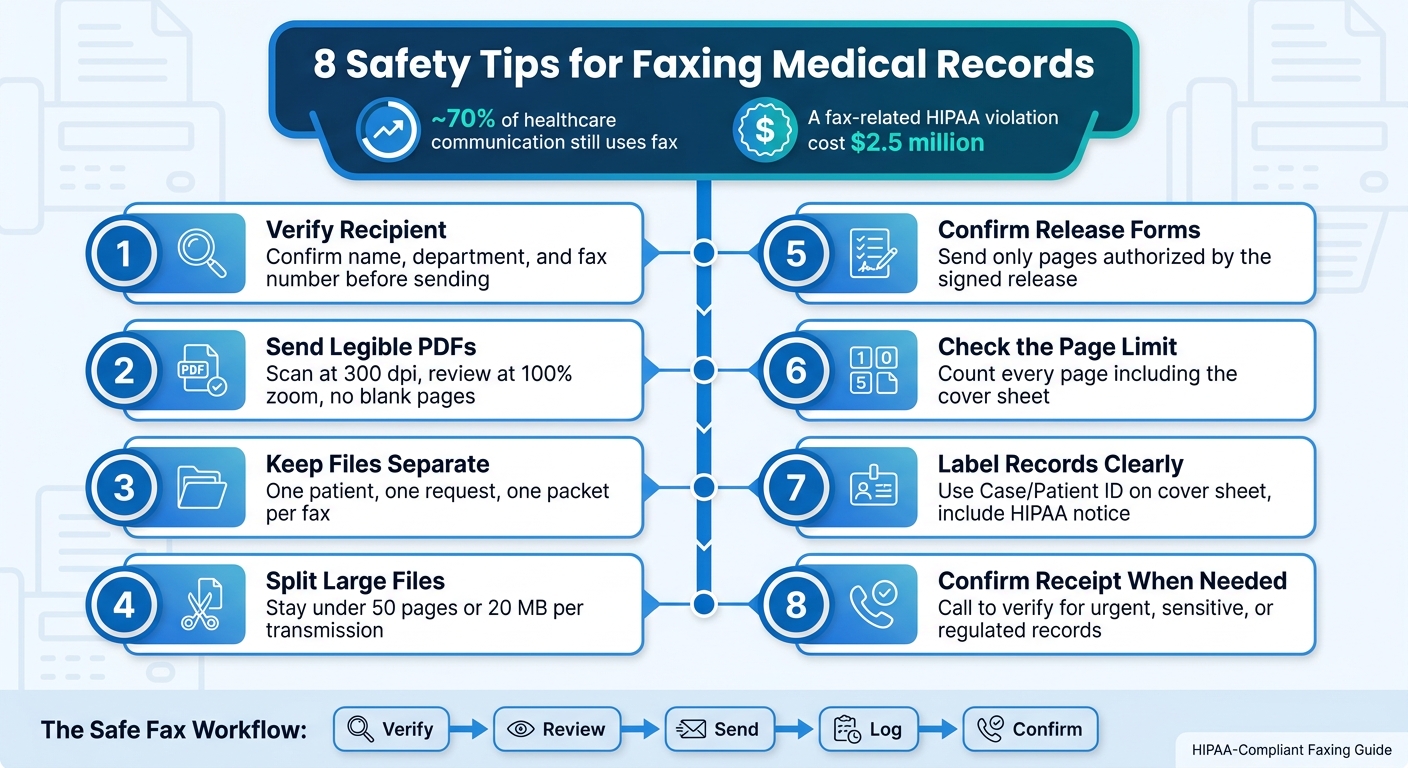
8 Safety Tips for Faxing Medical Records (HIPAA Checklist)
Quick Comparison
| Safety step | What I focus on | Main risk if skipped |
|---|---|---|
| Verify recipient | Name, department, fax number | Records go to the wrong office |
| Send clear files | Sharp, readable PDF at 100% zoom | Delays, resend requests |
| Keep files separate | One patient/request per packet | Wrong-chart filing |
| Split large files | Stay under page and size caps | Failed transmission |
| Review release | Send only what the form allows | HIPAA privacy issue |
| Check limits | Count all pages, including cover sheet | Upload failure |
| Label clearly | Use routing info and ID number | Misrouting on receipt |
| Prevent rejection | Include full patient IDs and ROI | Out-of-network denial |
| Confirm delivery | Save logs and call when needed | False sense of completion |
In short, I’d treat faxing medical records like a checklist task: verify, review, send, log, confirm. That simple process cuts down the most common fax errors without adding much time.
sbb-itb-0df24da
Before You Fax Medical Records
Before you send even one page, do a few quick checks first. Skipping them can lead to privacy issues, delays, or records landing in the wrong hands.
Confirm who you're sending to. Verify the recipient's name, department, and fax number before you send anything. Even if the fax number is correct, it can still route to the wrong department. If you're using a new number, confirm it with the receiving office first [7].
Check what you're allowed to send. Send only the records that were requested, and make sure you have a valid release in place [1][7].
Check the file before sending. Make sure each page is easy to read, turned the right way, and free of glare or cut-off text [3].
For urgent records, call ahead so the office is ready [7].
The eight tips below turn these checks into a safer faxing process.
1. Send Legible PDFs
After you confirm the recipient and the release, take a minute to check the file itself. Hard-to-read pages can slow down care and lead to resends. And every resend creates one more chance to misdial and send PHI to the wrong person.
The best option is a PDF made directly from the source file. It keeps text sharp and usually goes through cleanly.
Working from paper instead? Scan at 300 dpi in black-and-white mode. Then open the PDF before you upload it and review it at 100% zoom. Make sure every page is:
- correctly oriented
- readable at normal size
- free of blank pages
If the text looks fuzzy at 100% zoom, fix the file before sending. Also, unlock password-protected PDFs first. Most medical document fax services reject password-protected files.
2. Avoid Mixed Files
Don’t combine unrelated records in a single fax. That raises privacy risk and makes it easier for the receiving office to file pages in the wrong chart. And when pages land in the wrong chart, that can turn into a reportable privacy incident [7].
The fix is simple: put each request in its own packet before you send it.
Before sending, check that every page belongs in that packet. Audit each packet to confirm:
- the same patient
- the same request
- the same authorized date range
- no blank pages
- no unrelated pages [3][7]
That extra minute can prevent a messy mix-up on the other end.
3. Split Large Records
Even a clean, single-patient packet can still fail if the file is too big. Many online fax services cap uploads at 50 pages or 20 MB [1][4][5]. That’s why it helps to split large records into clearly numbered batches before you send them. It also keeps the packet tighter, so the recipient gets only the pages they need [7].
Start by reviewing the full record. Remove blank pages and anything that doesn’t need to go. Then split the remaining pages into batches that stay under your fax service’s page limit. On each cover sheet, include the batch number, page count, and date [7].
Keep the paperwork clean on your end too. Save each batch’s transmission log or status email as its own record [1][7]. If one batch fails, check the fax number before sending it again [7].
Once the packet is the right size, verify the release before faxing medical forms.
4. Confirm Release Forms
After you split the packet, match each batch to the correct authorization. Then check that the form covers only the pages you’re about to fax.
Here’s the easy way to think about it: if the form allows lab results, send lab results. Don’t slip in therapy notes or any other unrelated pages. That’s where mistakes happen.
Not every fax needs patient authorization. Under HIPAA, faxing is usually allowed for treatment, payment, and healthcare operations without a patient release. That includes things like referrals and prior authorizations. Once you confirm whether an authorization is needed, check the page limit before sending.
Before you fax, review these items:
| Verification Item | What to Confirm |
|---|---|
| Patient Identity | The patient's name and other identifiers match the records being prepared [7] |
| Authorized Pages | Only the specific pages authorized by the form are included [7] |
| Signed Authorization | The form is current, signed by the patient or legal representative, and includes the expiration date [2][6] |
Mental health and financial records need extra care. Before faxing those, review the authorization language closely.
5. Check the Page Limit
Once the release check is done, the next hurdle is page count. Most online fax services set a cap on pages or file size. OneFaxNow allows up to 50 pages or 20 MB per file. If you go past either limit, the fax fails.
Even when a file stays within the limit, problems can still pop up. A busy receiving line can cause the fax to fail, and long transmissions are more likely to run into trouble on the recipient’s end.
Send only the pages the request calls for. Before you upload anything, count every page - including the cover sheet and any required forms. Cut blank pages or anything that doesn’t need to be there. That trims privacy risk and keeps the file easier to send.
If the packet is too large, split it into smaller files before uploading.
If the file fits, move on to labeling the records clearly.
6. Label Records Clearly
Once the packet is ready, add a clear cover sheet so staff can route it fast. If the cover sheet is vague, records can land with the wrong person. In a busy clinic, unlabeled faxes sitting on a shared output tray can easily be picked up by someone who shouldn't have them. And a mislabeled fax can end up in the wrong chart or with the wrong recipient.
Use a cover sheet with routing details only. Don't put the patient's full name on the cover sheet. Instead, use a Case ID or Patient ID so staff can match the records to the right file without exposing PHI [6].
The cover sheet should include:
- Sender and recipient names
- Date
- Total pages
- Case ID or Patient ID
- A HIPAA confidentiality notice [1][6][7]
That notice warns unintended recipients not to review, copy, or share the contents [1][6][7]. Put simply, the cover sheet gives staff what they need to route the fax without exposing PHI.
After labeling, check for transmission problems and fax failures.
7. Watch for Failed Sends
Sent doesn't always mean delivered. That's a big distinction, and it's easy to miss when you're moving fast.
If the recipient's line is busy, the number has changed, or the file can't be processed, the fax may fail. And if that happens, the records never arrive.
When a fax fails, check the recipient's fax number, make sure the file isn't locked, and resend only after you've fixed the problem [3][7].
| Fax Status | What It Means | What to Do |
|---|---|---|
| Pending / Sending | Transmission in progress | Wait; do not resend yet |
| Busy / Retrying | Recipient line is occupied; auto-retrying up to 3x | Wait for retries to finish |
| Delivered / Success | Fax reached the recipient's machine | Save the transmission log |
| Failed | Could not complete after all retries | Recheck the fax number and resend |
There's one more thing here: Delivered means the fax reached the machine. It does not mean someone opened it, reviewed it, or acted on it.
When records are urgent, status alone isn't enough. Confirm receipt next.
8. Confirm Receipt When Needed
If the fax is time-sensitive, a delivered status by itself isn't enough. For urgent dental referrals, mental health records, or legal or compliance use, call the recipient and make sure the fax came through clearly.
When you call, keep it simple:
- Read back the fax number
- Confirm the right department got it
- Ask whether all pages arrived clearly
- Log the contact's name with the transmission record
If the recipient says the fax never arrived despite a "Success" status, don't resend right away. First, verify the fax number against an official source. Providers often change telecom vendors or move locations, and an old number can send records to the wrong place.
| Situation | Action |
|---|---|
Routine records with a "Delivered" status |
Save the transmission log |
| Urgent, sensitive, or regulated records | Call to confirm receipt, legibility, and page count; log the contact's name |
"Success" status, but recipient can't find it |
Verify the fax number before resending [7] |
Notes on Using an Online Fax Service
If you use an online fax service, make sure it supports a few basic checks.
OneFaxNow accepts common file types: PDF, DOCX, TXT, JPG/JPEG, PNG, and TIF/TIFF. It also limits each transmission to 50 pages or 20 MB. That becomes important fast if you're sending larger records and need to split them into separate batches.
You can add an optional cover page for routing details and a confidentiality notice. Just note that the cover page counts toward the total page limit.
Status emails include a job ID and a tracking link. If the receiving line is busy, the system retries up to three times automatically. That makes it easier to track delivery and check whether a resend is needed.
For medical records, HIPAA handling is the main thing to look at. If the fax includes PHI, use the optional HIPAA mode: $3.00 for 1–10 pages and $5.00 for 11–50 pages. That adds stricter handling, audit logging, and a BAA available for immediate execution [4]. Payment is captured on successful delivery only [4][5].
Conclusion
These eight checks make faxing safer when things get hectic.
Safe faxing comes down to a fixed checklist: send a clean file, include only the records that were asked for, verify the number, save the transmission log after each fax, and confirm receipt for urgent or sensitive records.
The biggest risk usually isn't the fax machine itself. It's skipping a step when the pressure is on. A safeguard only helps if you use it every single time.
If you use an online fax service, check for HIPAA-compliant faxing, delivery tracking, and BAA support before sending PHI.
FAQs
When is a patient release required?
A patient release is required when it’s needed to lawfully disclose medical records.
Faxing records is allowed under HIPAA as long as you use reasonable and appropriate safeguards to protect PHI. HIPAA does not require any one type of technology.
If you work with a vendor, you’ll usually also need a signed BAA in place.
What should I do if a fax shows delivered but the office can’t find it?
First, make sure you sent it to the right fax number and that the file was labeled clearly. Then ask the office to check with the correct department or fax queue, because even delivered faxes can end up in the wrong place.
If needed, resend the records and confirm they received them. Using a service with status tracking and automatic retries can also help catch failed or misdirected sends.
How can I fax large medical records without errors?
To cut down on errors, send clear, easy-to-read PDFs, avoid mixing unrelated files, split records that run longer than 50 pages, confirm whether any release forms are required, check your service’s page limits, and label records with a HIPAA-compliant cover sheet.
It also helps to verify the fax number, watch for failed transmissions, and confirm receipt when needed.
For one-time medical record transfers, OneFaxNow offers a pay-per-fax option with an optional HIPAA mode.